Advanced Logging
Enable Advanced Logging in Breadwinner (Platform Event Based)
Breadwinner’s Advanced Logging automatically captures detailed error information and stores it directly in Salesforce, removing the need for manual log checks. But it does require some custom configuration on your part.
This guide provides step-by-step instructions for enabling and configuring this feature.
This is an advanced feature.
You will need to know how to create custom objects and a flow in Salesforce. Breadwinner cannot configure this for you because every Salesforce organization is different and may process this information differently.
Prerequisites
Before starting, make sure:
- Breadwinner is already installed
- You have Salesforce Administrator access
- You have a Business plan or higher
Note: If these requirements are not met, the Platform Event picklist and Save button will remain disabled.
Step 1: Create a Platform Event
- Open Setup
- Search for Platform Events
- Click New Platform Event
- Enter: • Label: BW Error Log • API Name: BW_Error_Log
- Publish Behavior: Publish Immediately
- Click Save
Note: We will use the BW_Error_Log name in the examples below, but you can use any object name you wish.
Create the Following Fields
- All three fields are required and must use the exact API names shown below.
- If any field is missing or named incorrectly, Breadwinner will silently skip publishing the event.
- Detail__c must be a Long Text Area with a minimum length of 32768 characters.
Field Name | API Name (after save) | Type | Description |
|---|---|---|---|
Action | Action__c | Text(255) | The sync operation or feature that encountered the error |
Event Type | Event_Type__c | Text(255) | Severity/type of the event — always ERROR (other severity types are currently not supported) |
Detail | Detail__c | Long Text Area (32768) | Full error message or exception detail from the operation |
Step 2: Create and Assign the Permission Set
- Create a Permission Set granting Create access on the BW_Error_Log__e Platform Event object, then assign it to all users who use Breadwinner — this includes both Salesforce Administrators and non-admin users.
This permission set must be assigned to every Breadwinner user for Advanced Logging to function. If it is missing for any user, error logs will not be captured for actions they perform.
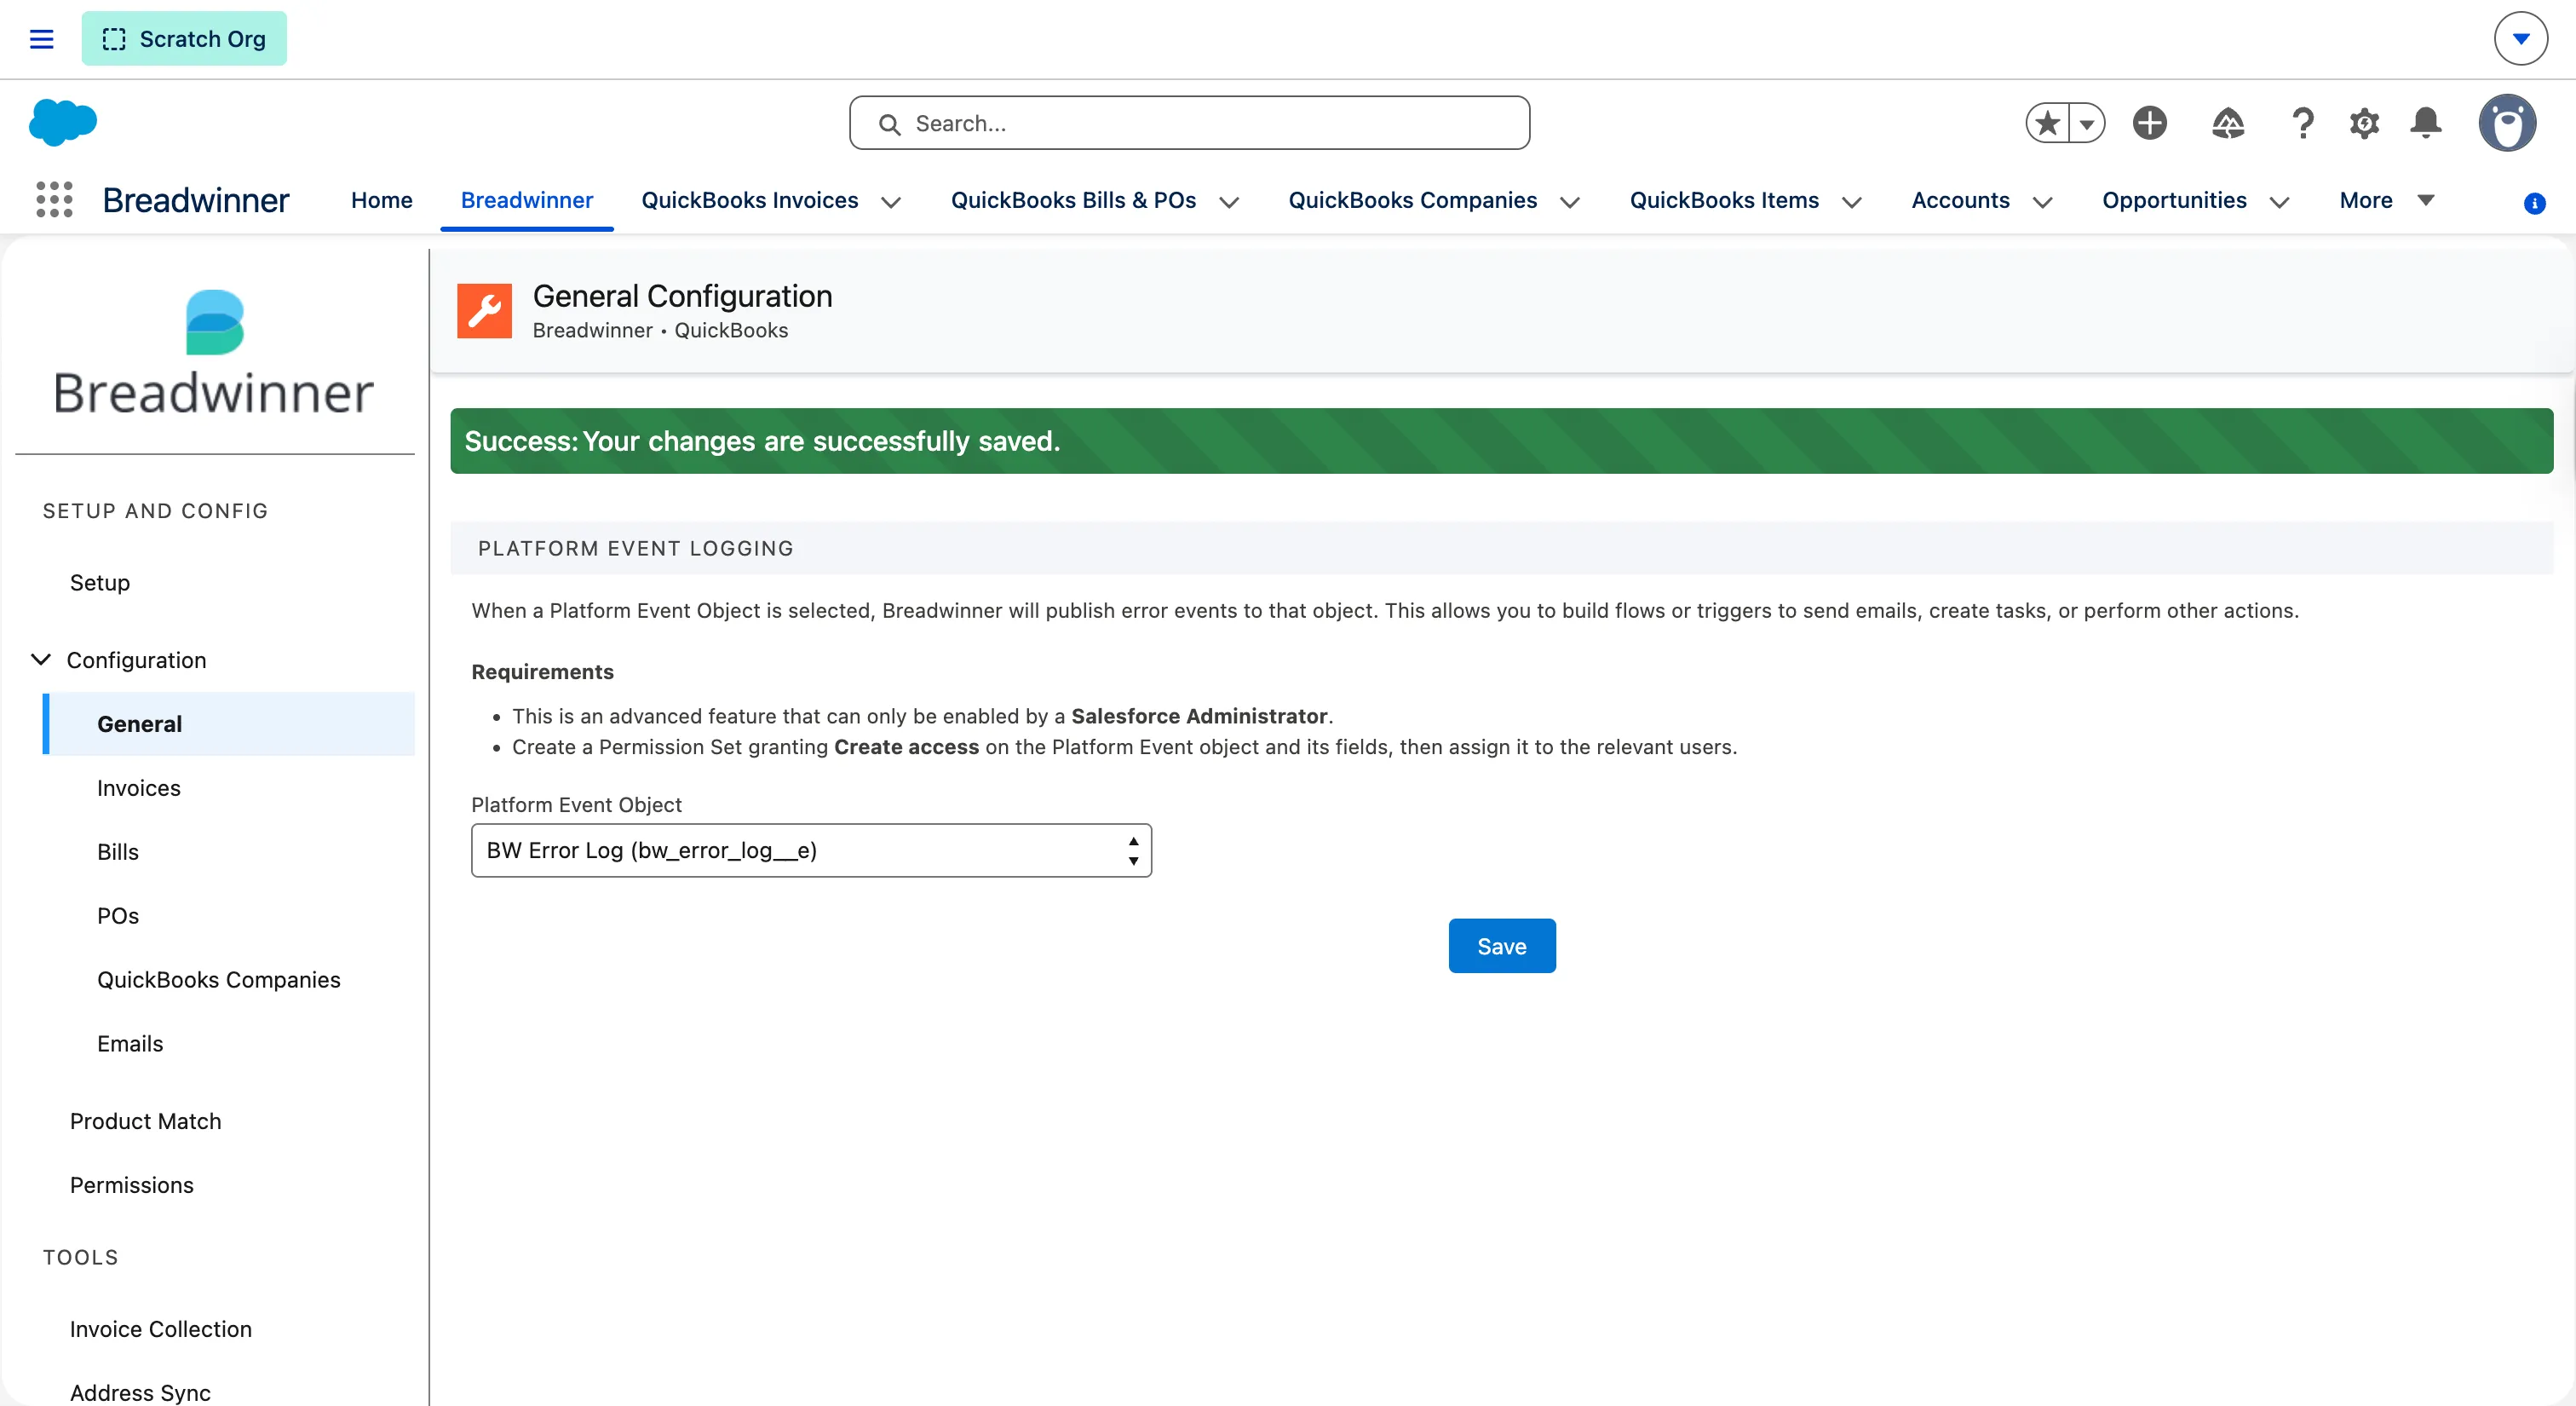
Step 3: Enable Advanced Logging in Breadwinner
- In the Breadwinner app, open the Breadwinner tab
- Navigate to Configuration → General
- Open the Platform Event dropdown • Only Platform Event objects will appear
- Select the Platform Event you created above (example: BW_Error_Log) and click Save.
Step 4: Create a Custom Log Object
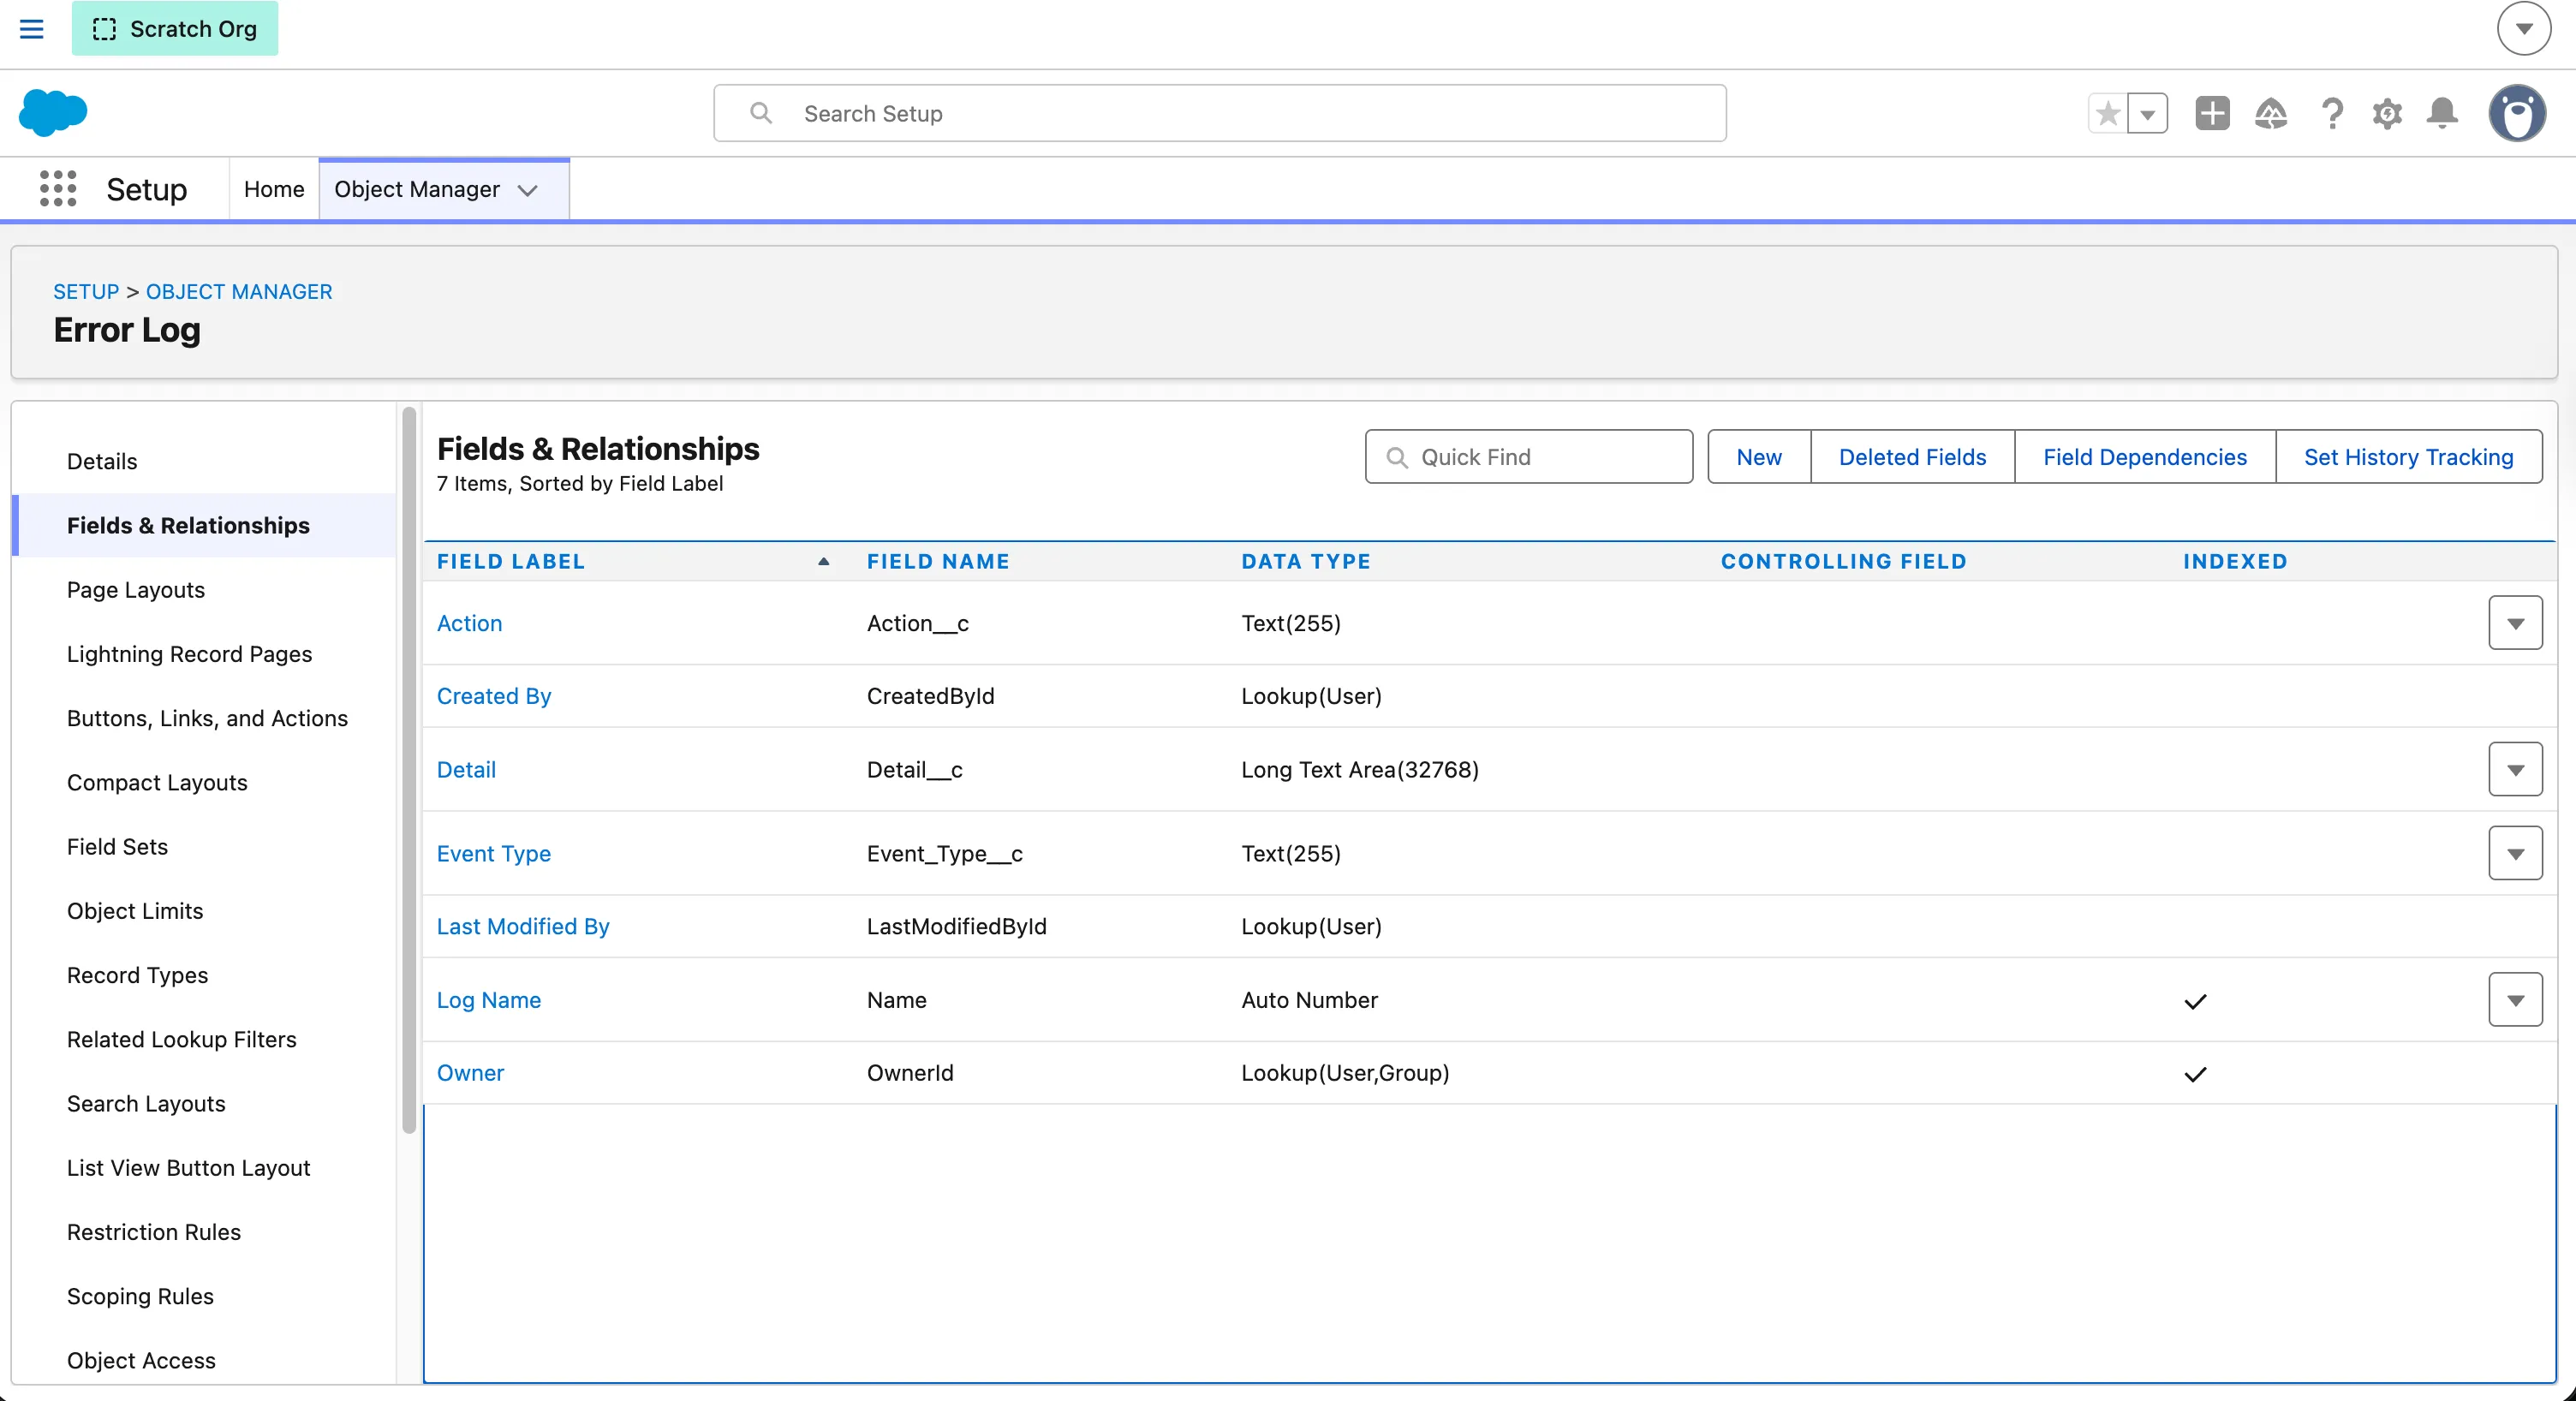
This object stores logs generated by Breadwinner events. This can be any name you wish but we suggest something like below.
- Open Setup (⚙️ gear icon)
- Search for Object Manager
- Click Create → Custom Object
Object Details
- Label: Error Log
- Plural Label: Error Logs
- API Name: Error_Log
- Record Name: Log Name
- Data Type: Auto Number
- Format: LOG-{00000000}
- Check ‘Enable Reports’
Create the Following Fields
Field Name | Type |
|---|---|
Action | Text(255) |
Event Type | Text(255) |
Detail | Long Text Area (32768) |
Step 5: Create a Platform Event–Triggered Flow
This flow listens to Breadwinner’s platform events and saves them as records.
- Open Setup (⚙️ gear icon)
- Search for Flows
- Click New Flow
- Select Platform Event–Triggered Flow
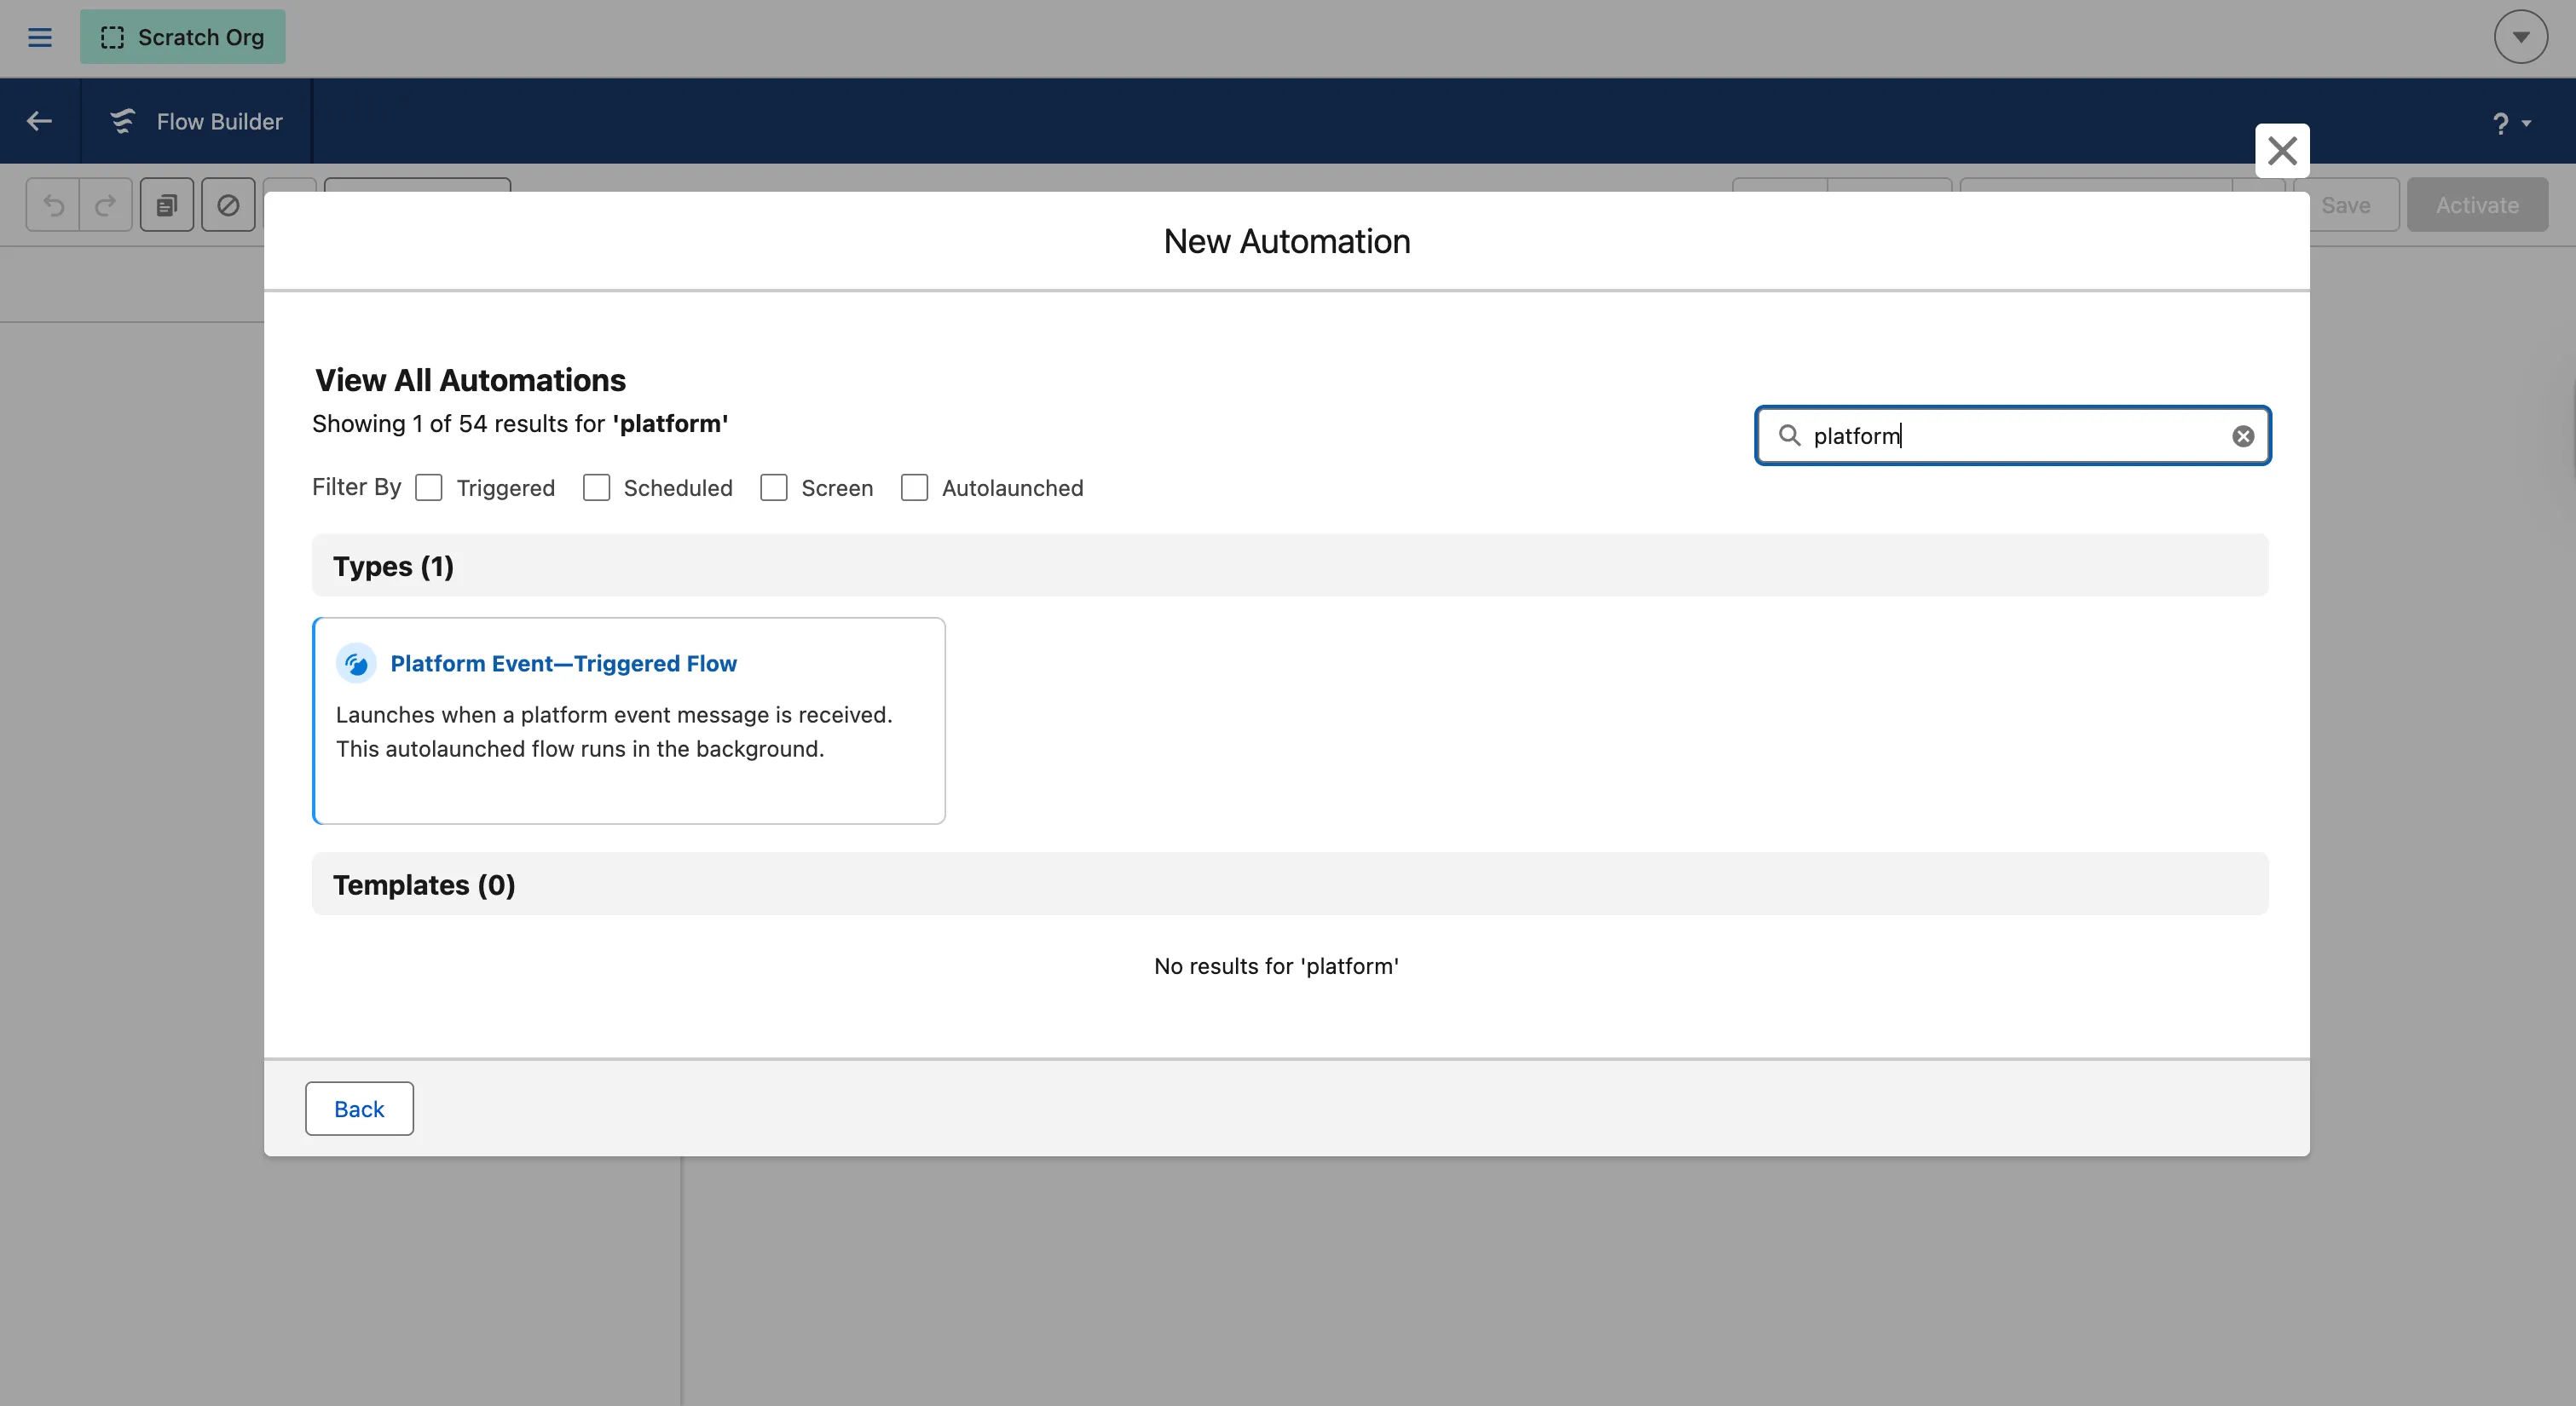
Choose the Platform Event
Platform Event: BW_Error_Log__e (created in Step 1)
Configure the Platform Event
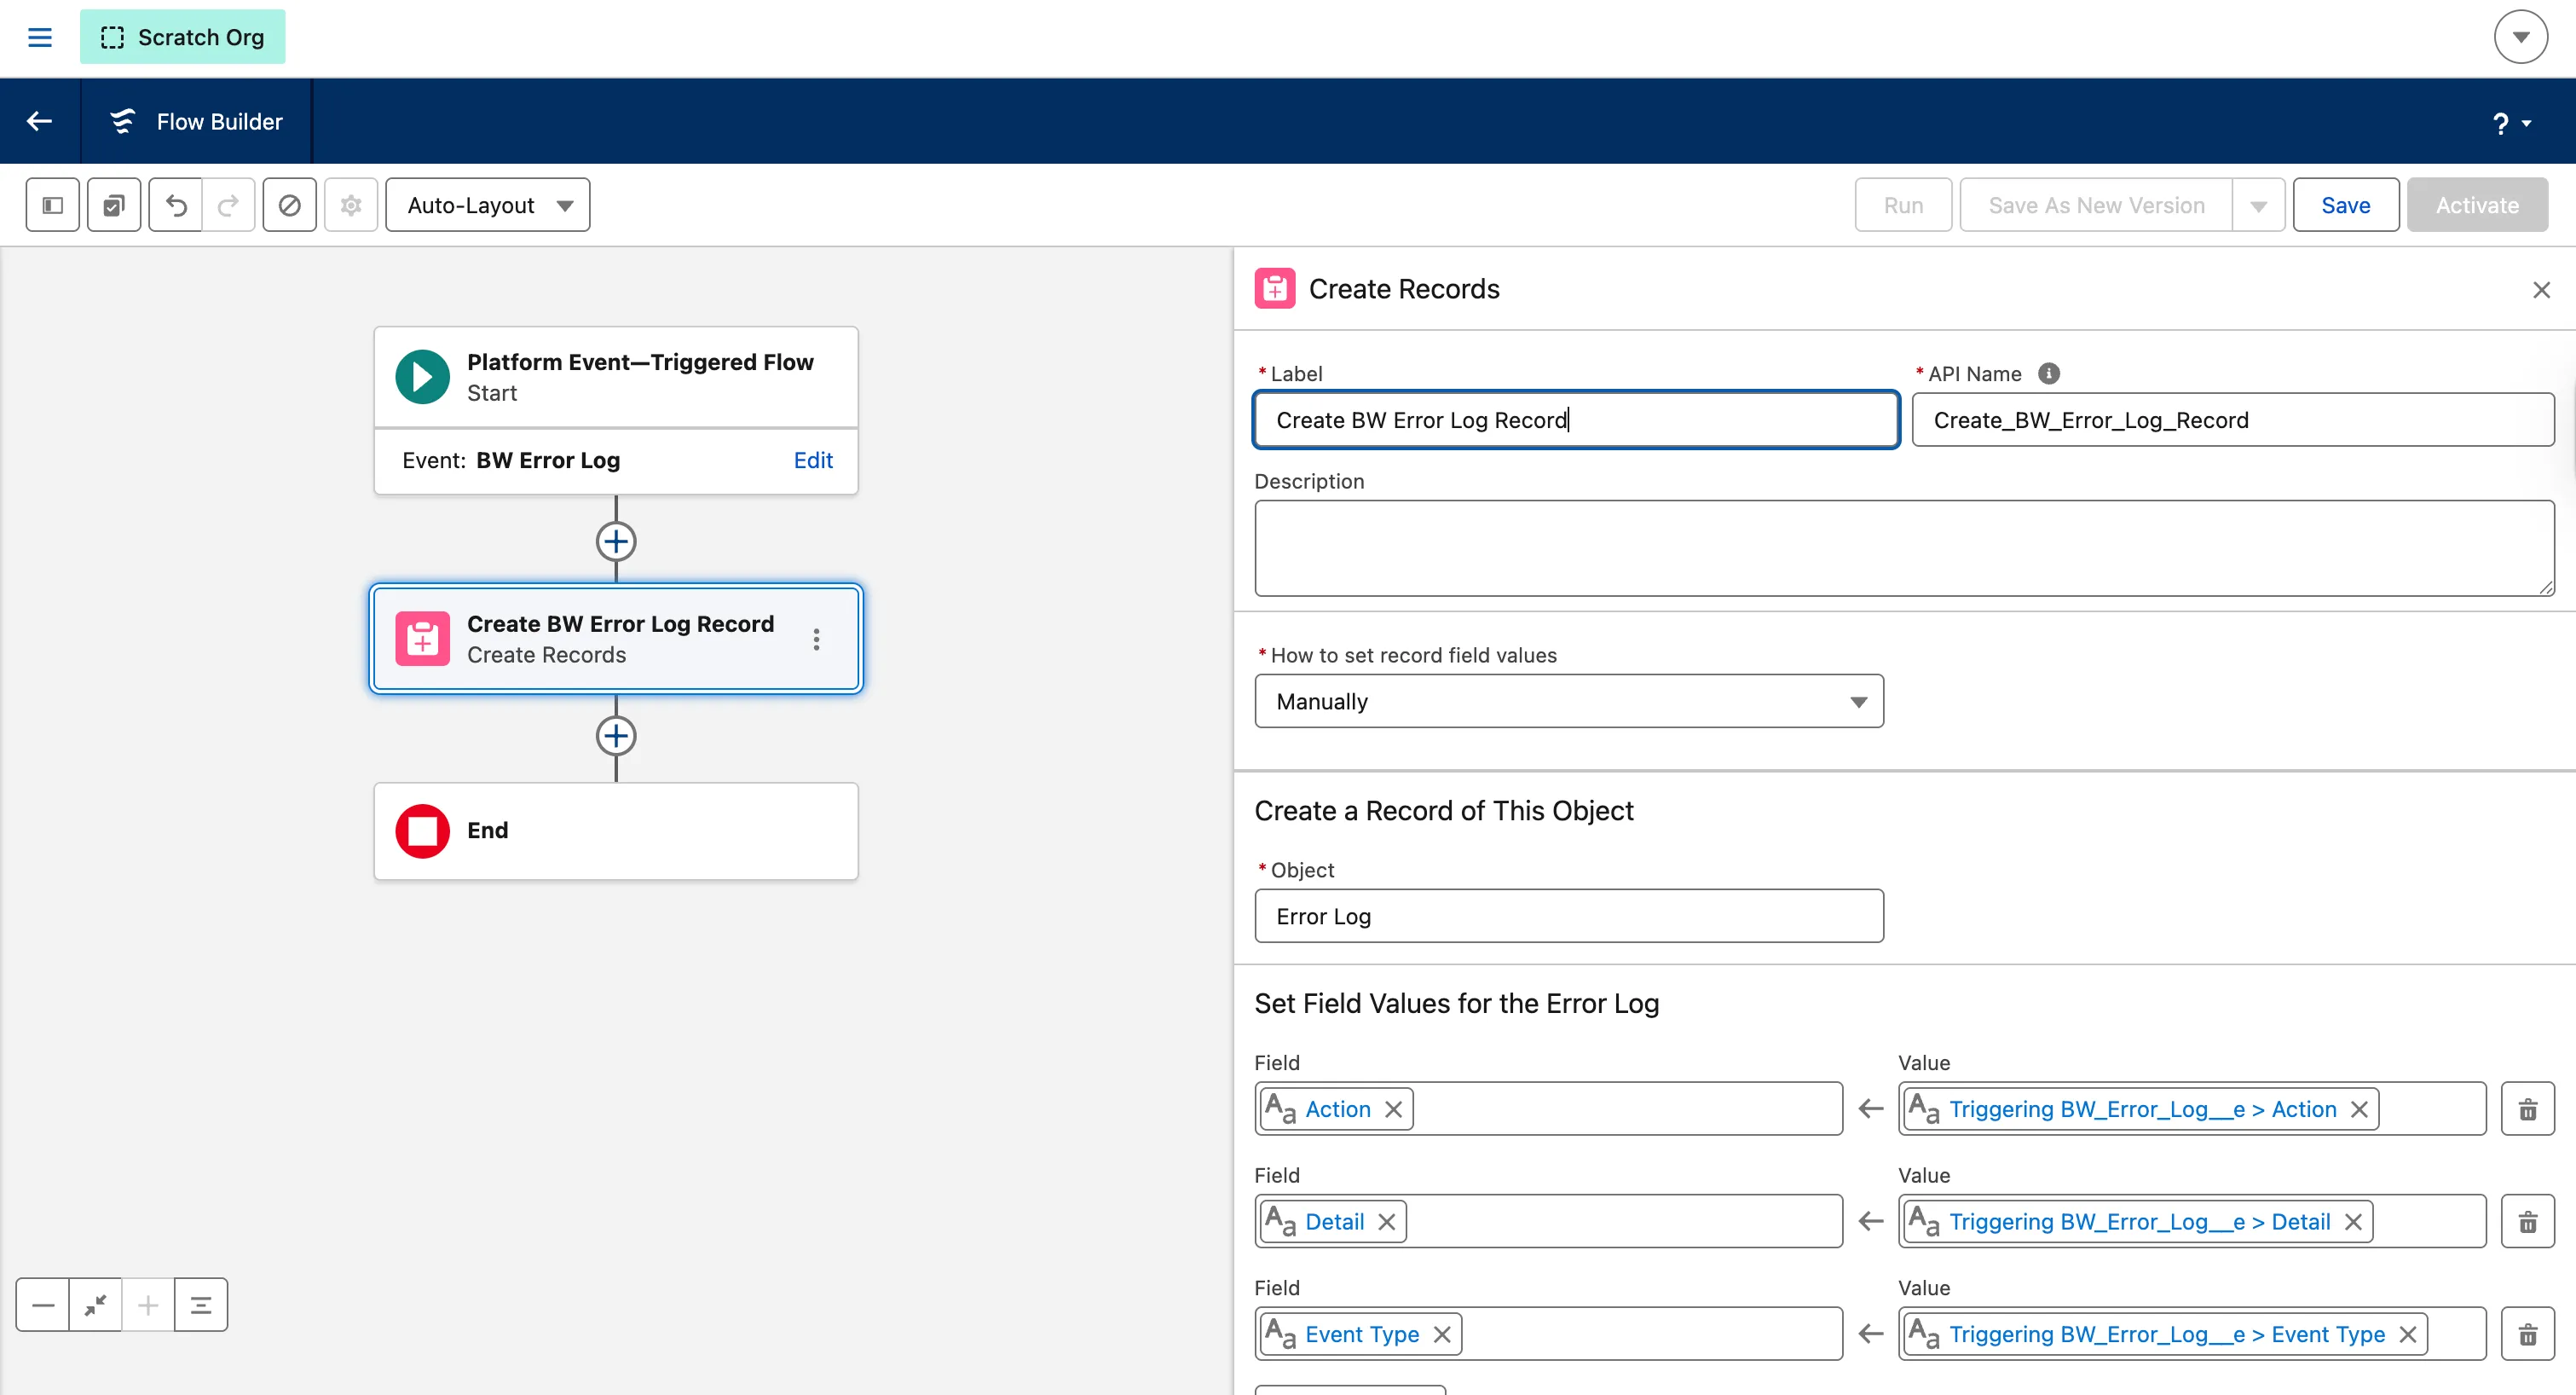
- Add a Create Records element
- Label: Create BW Error Log Record
- How to set record field values: Manually
- Create a Record of This Object: Error Log (created in Step 4)
- Map the fields as below:
Error Log (Error_Log__c) | BW Error Log (BW_Error_Log__e) | |
|---|---|---|
Action__c | Action__c | |
Event_Type__c | Event_Type__c | |
Detail__c | Detail__c | |
- Save the flow
- Flow Name: BW Platform Event Logger
- Click Activate
Step 6: Test the Setup (Intentional Error Test)
To confirm that Advanced Logging works, we’ll intentionally trigger an error.
Create an Error Scenario
- Open Setup (⚙️ gear icon)
- Open Object Manager
- Open QuickBooks Company
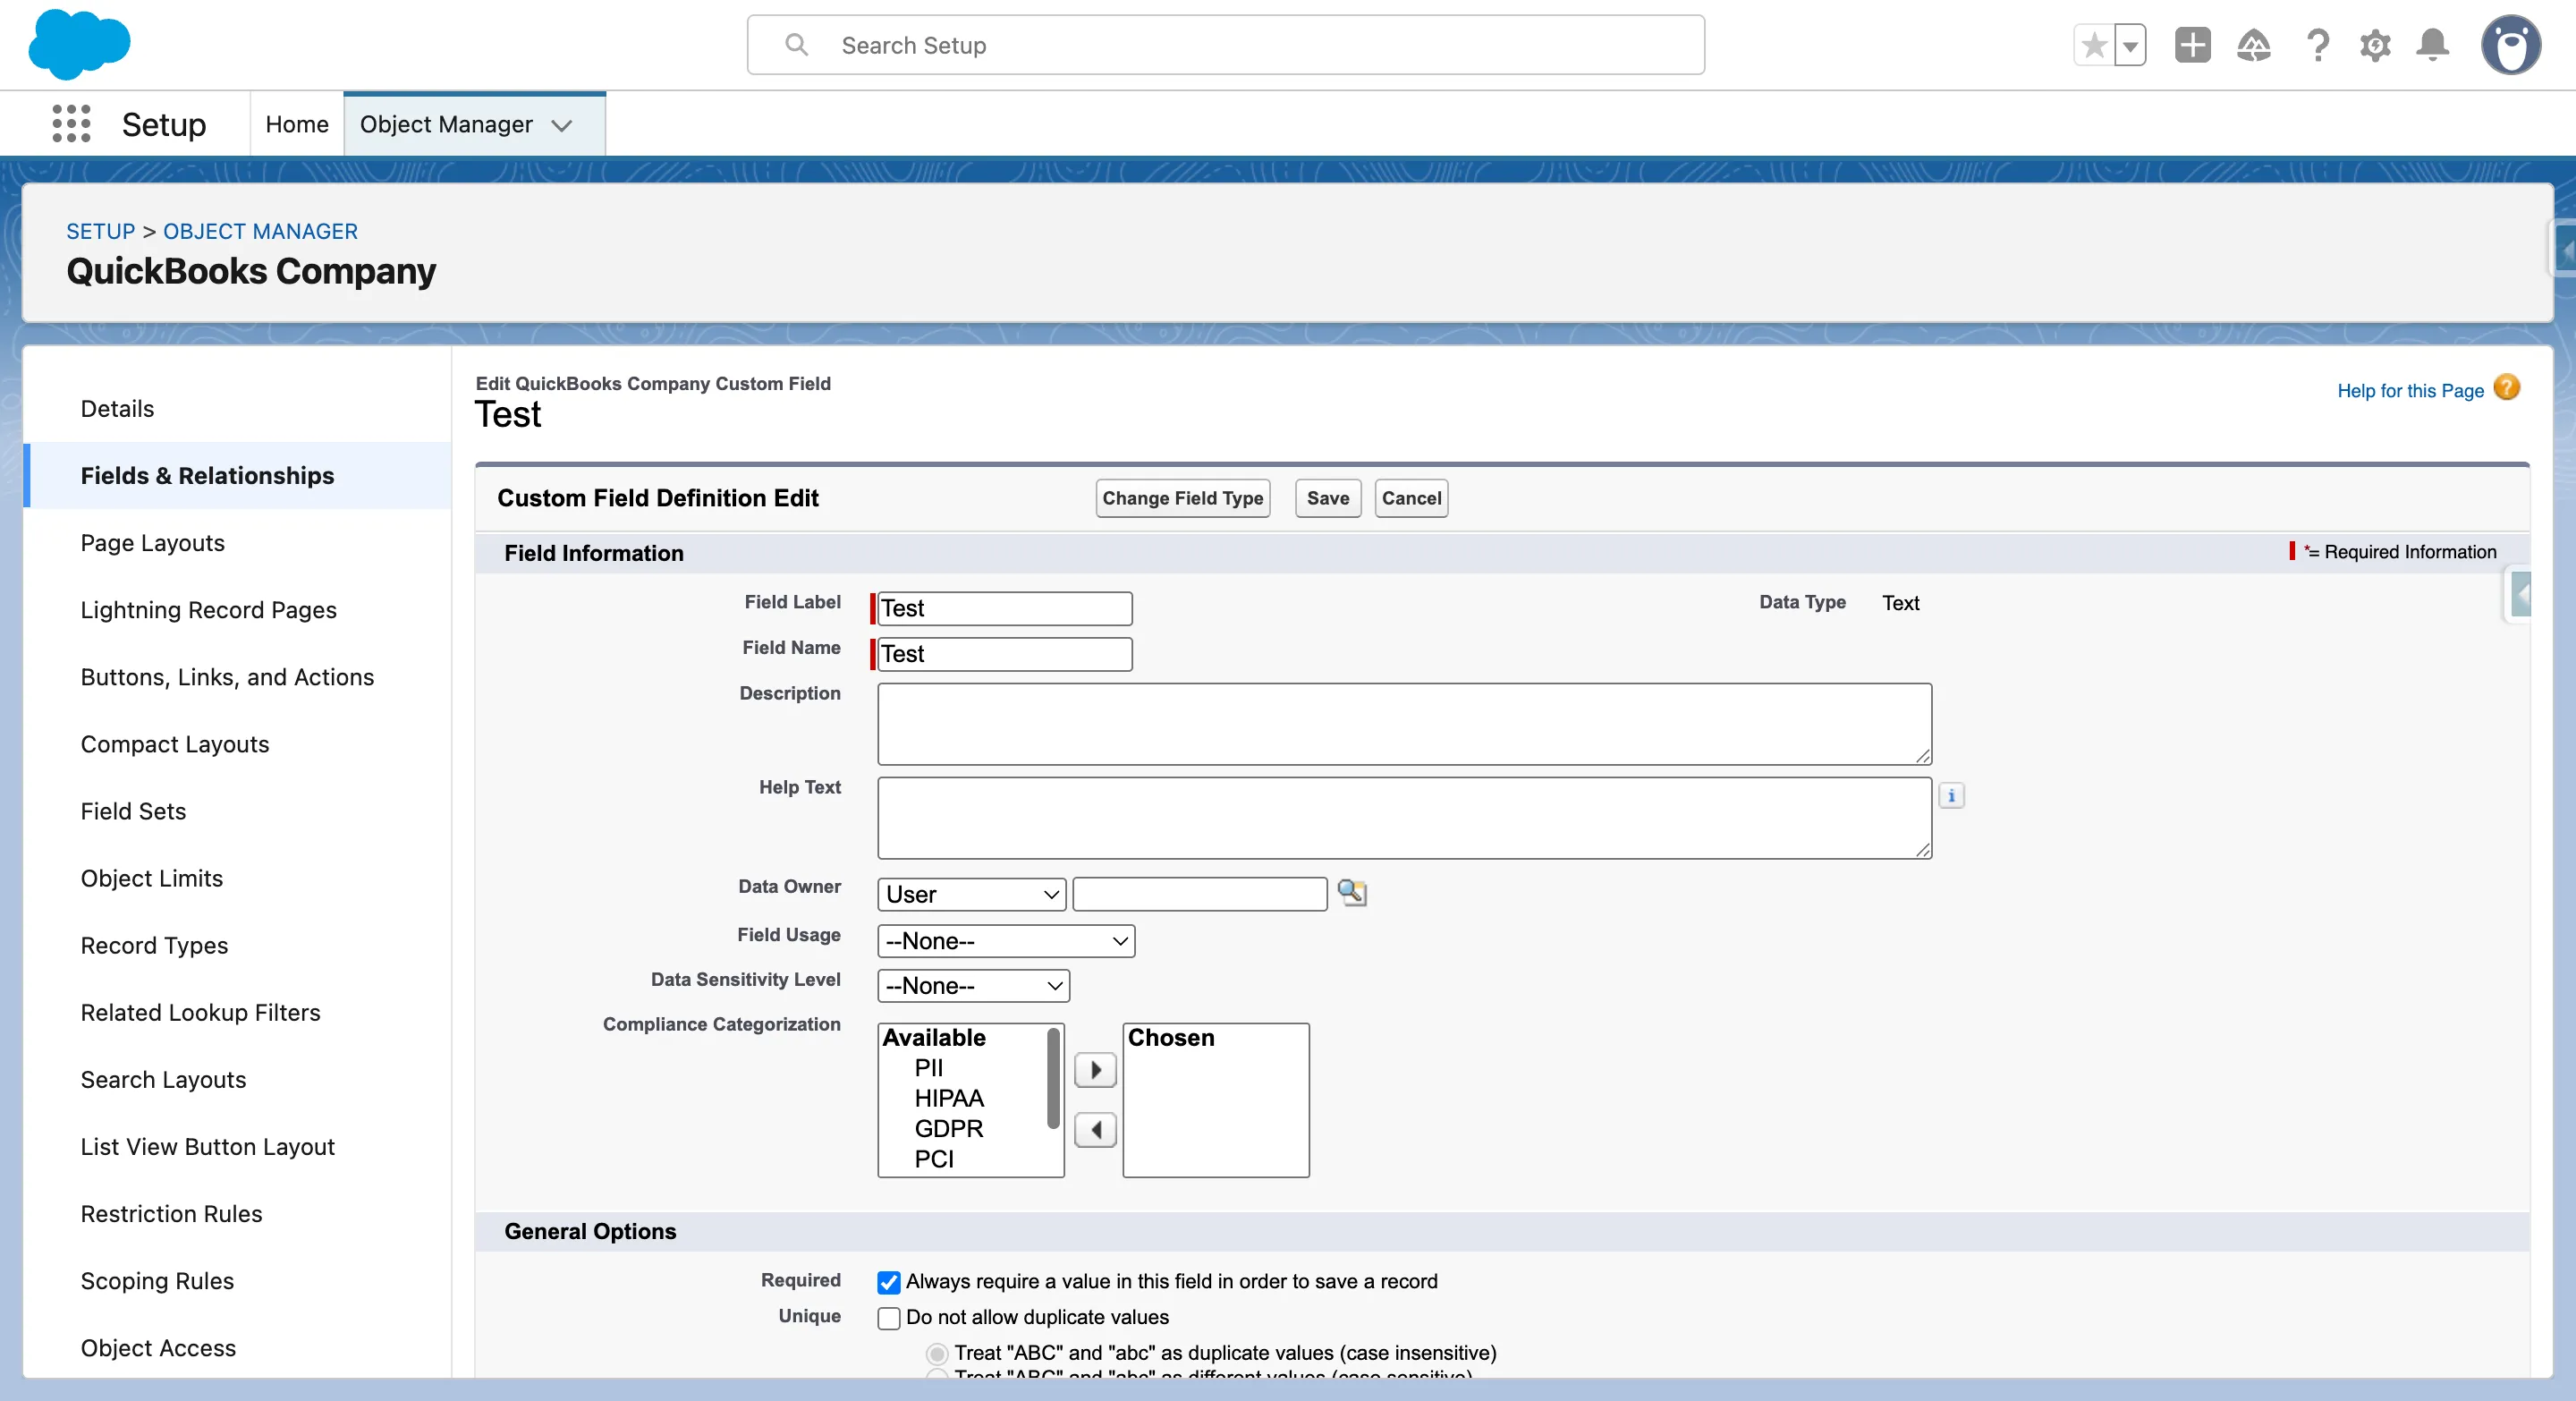
- Create a new field:
- Field Name: Test
- Type: Text
- Mark as Required
- Save the field
Trigger the Error
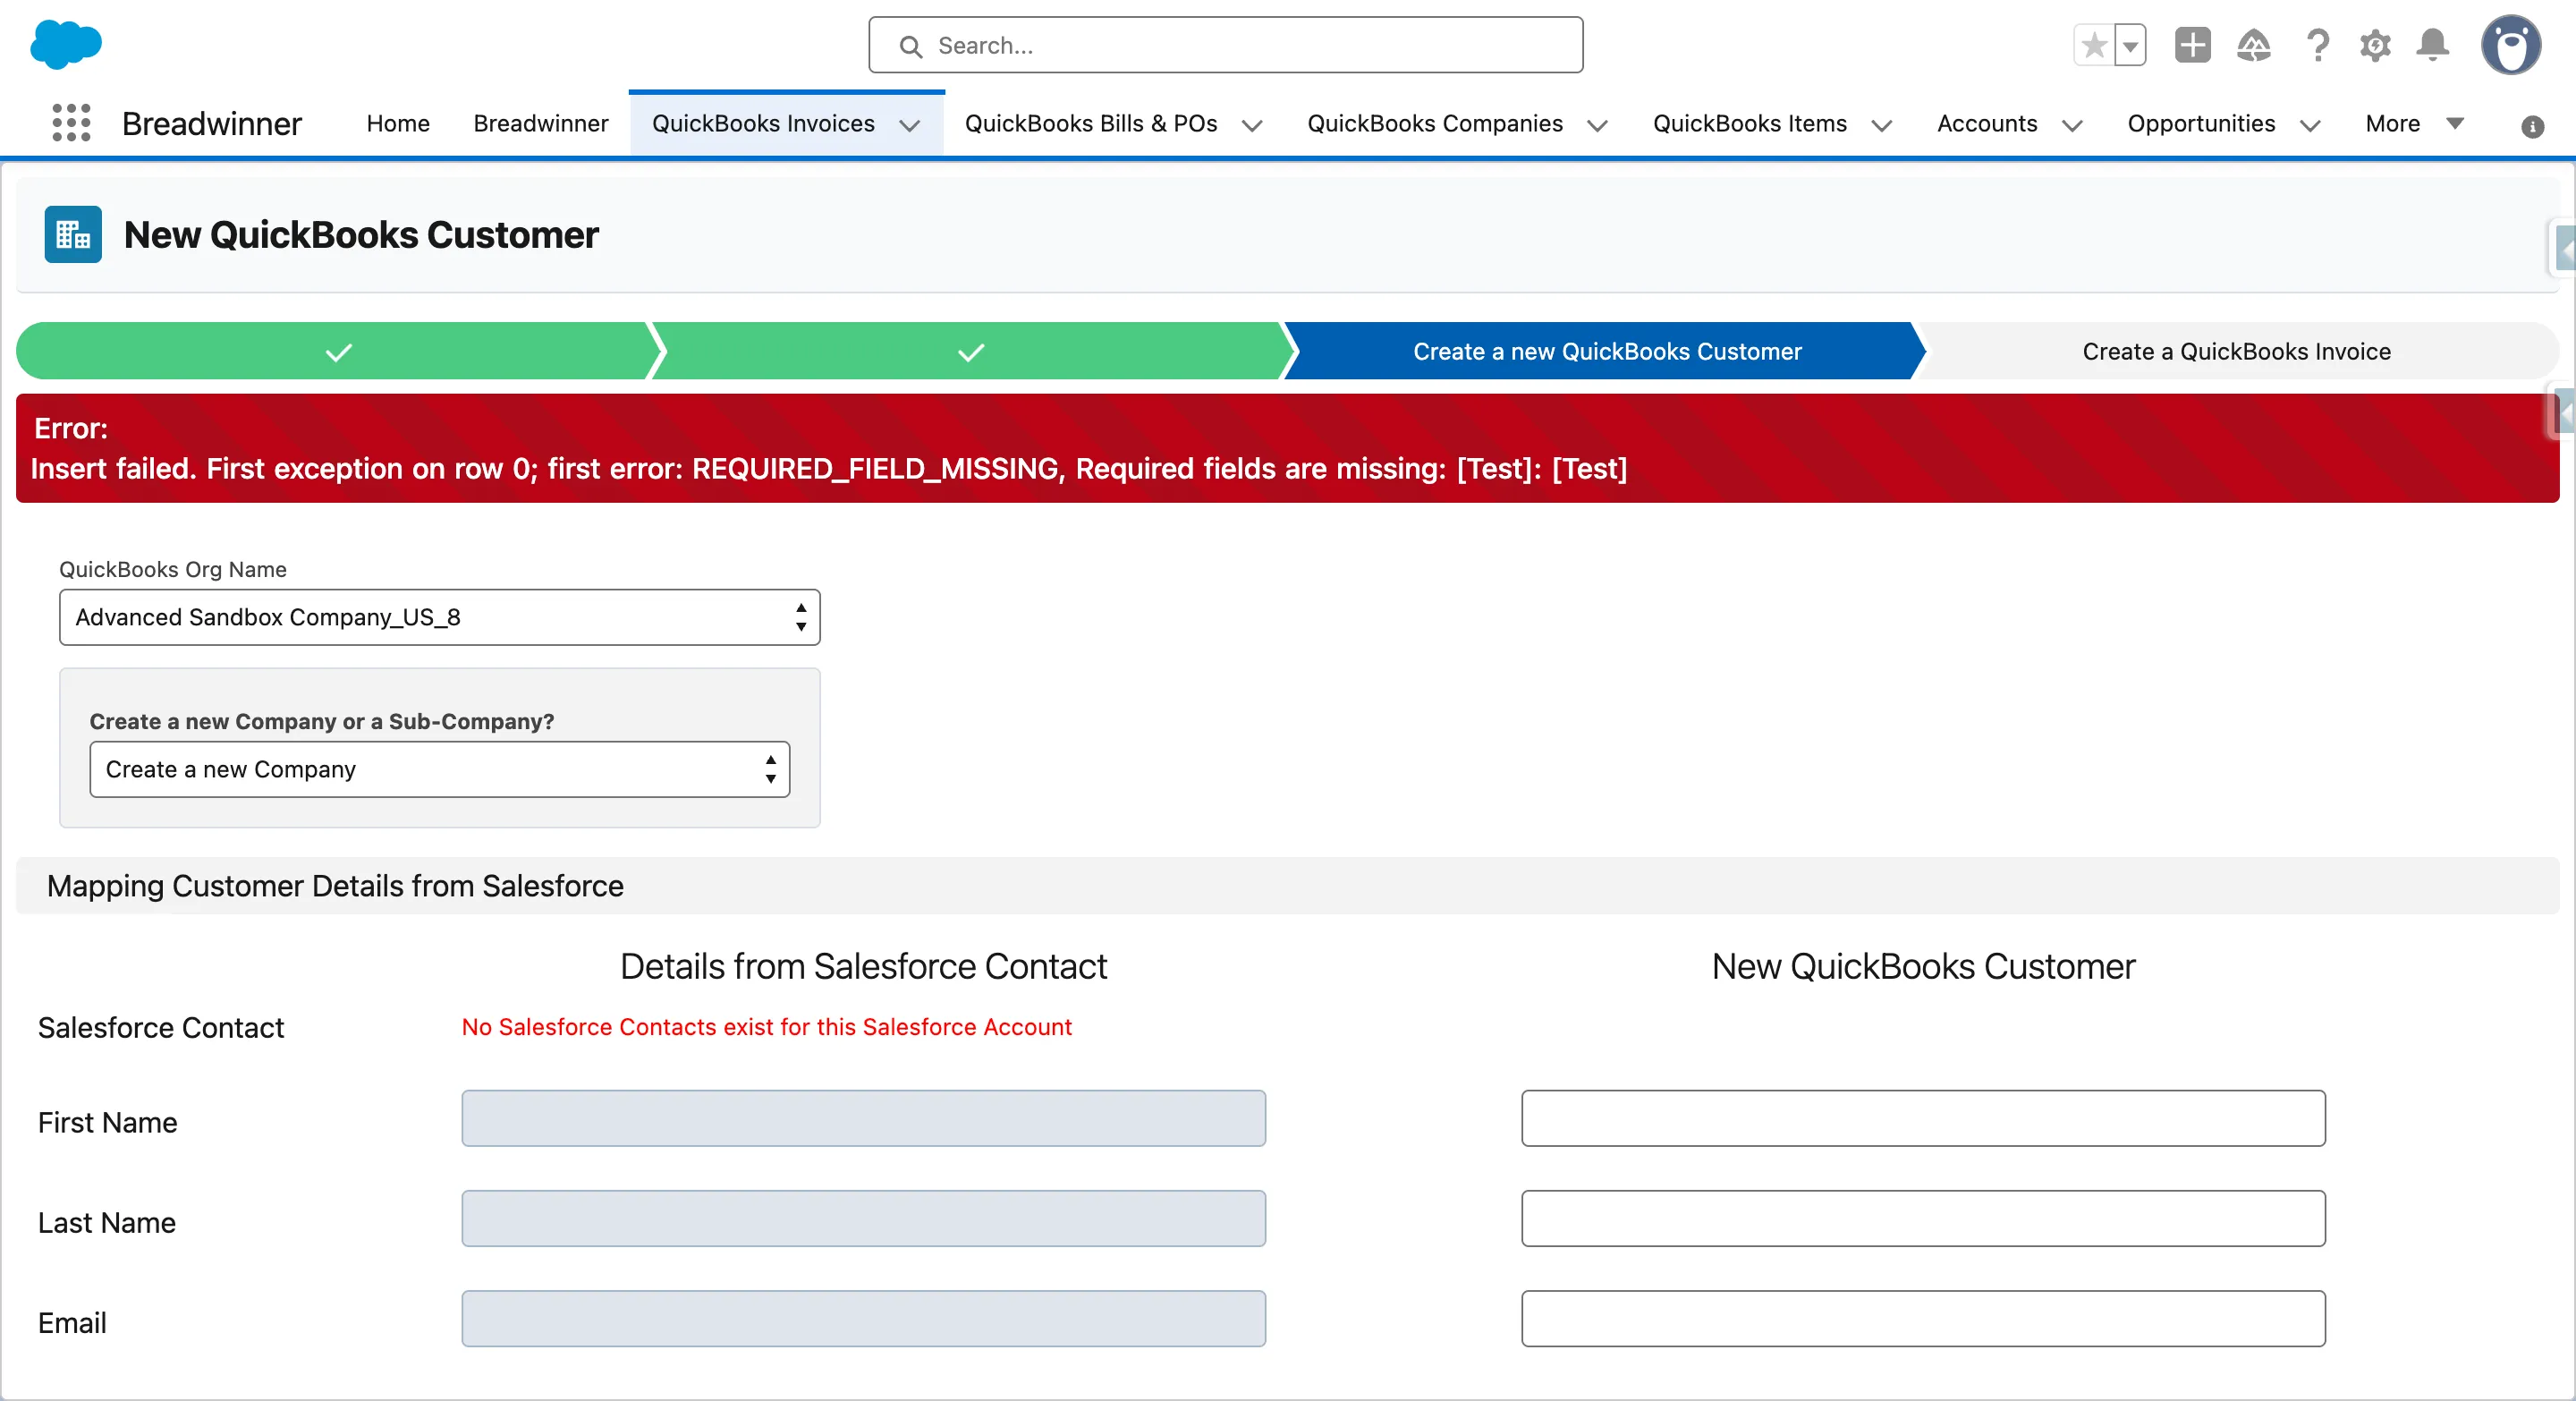
- Go to an Account and click New Invoice.
- Select 'Create a new QuickBooks Customer', enter a Display Name, and click Save to trigger the error.
Step 7: Validate Advanced Logging
Once the error pop-up appears, the following happens automatically:
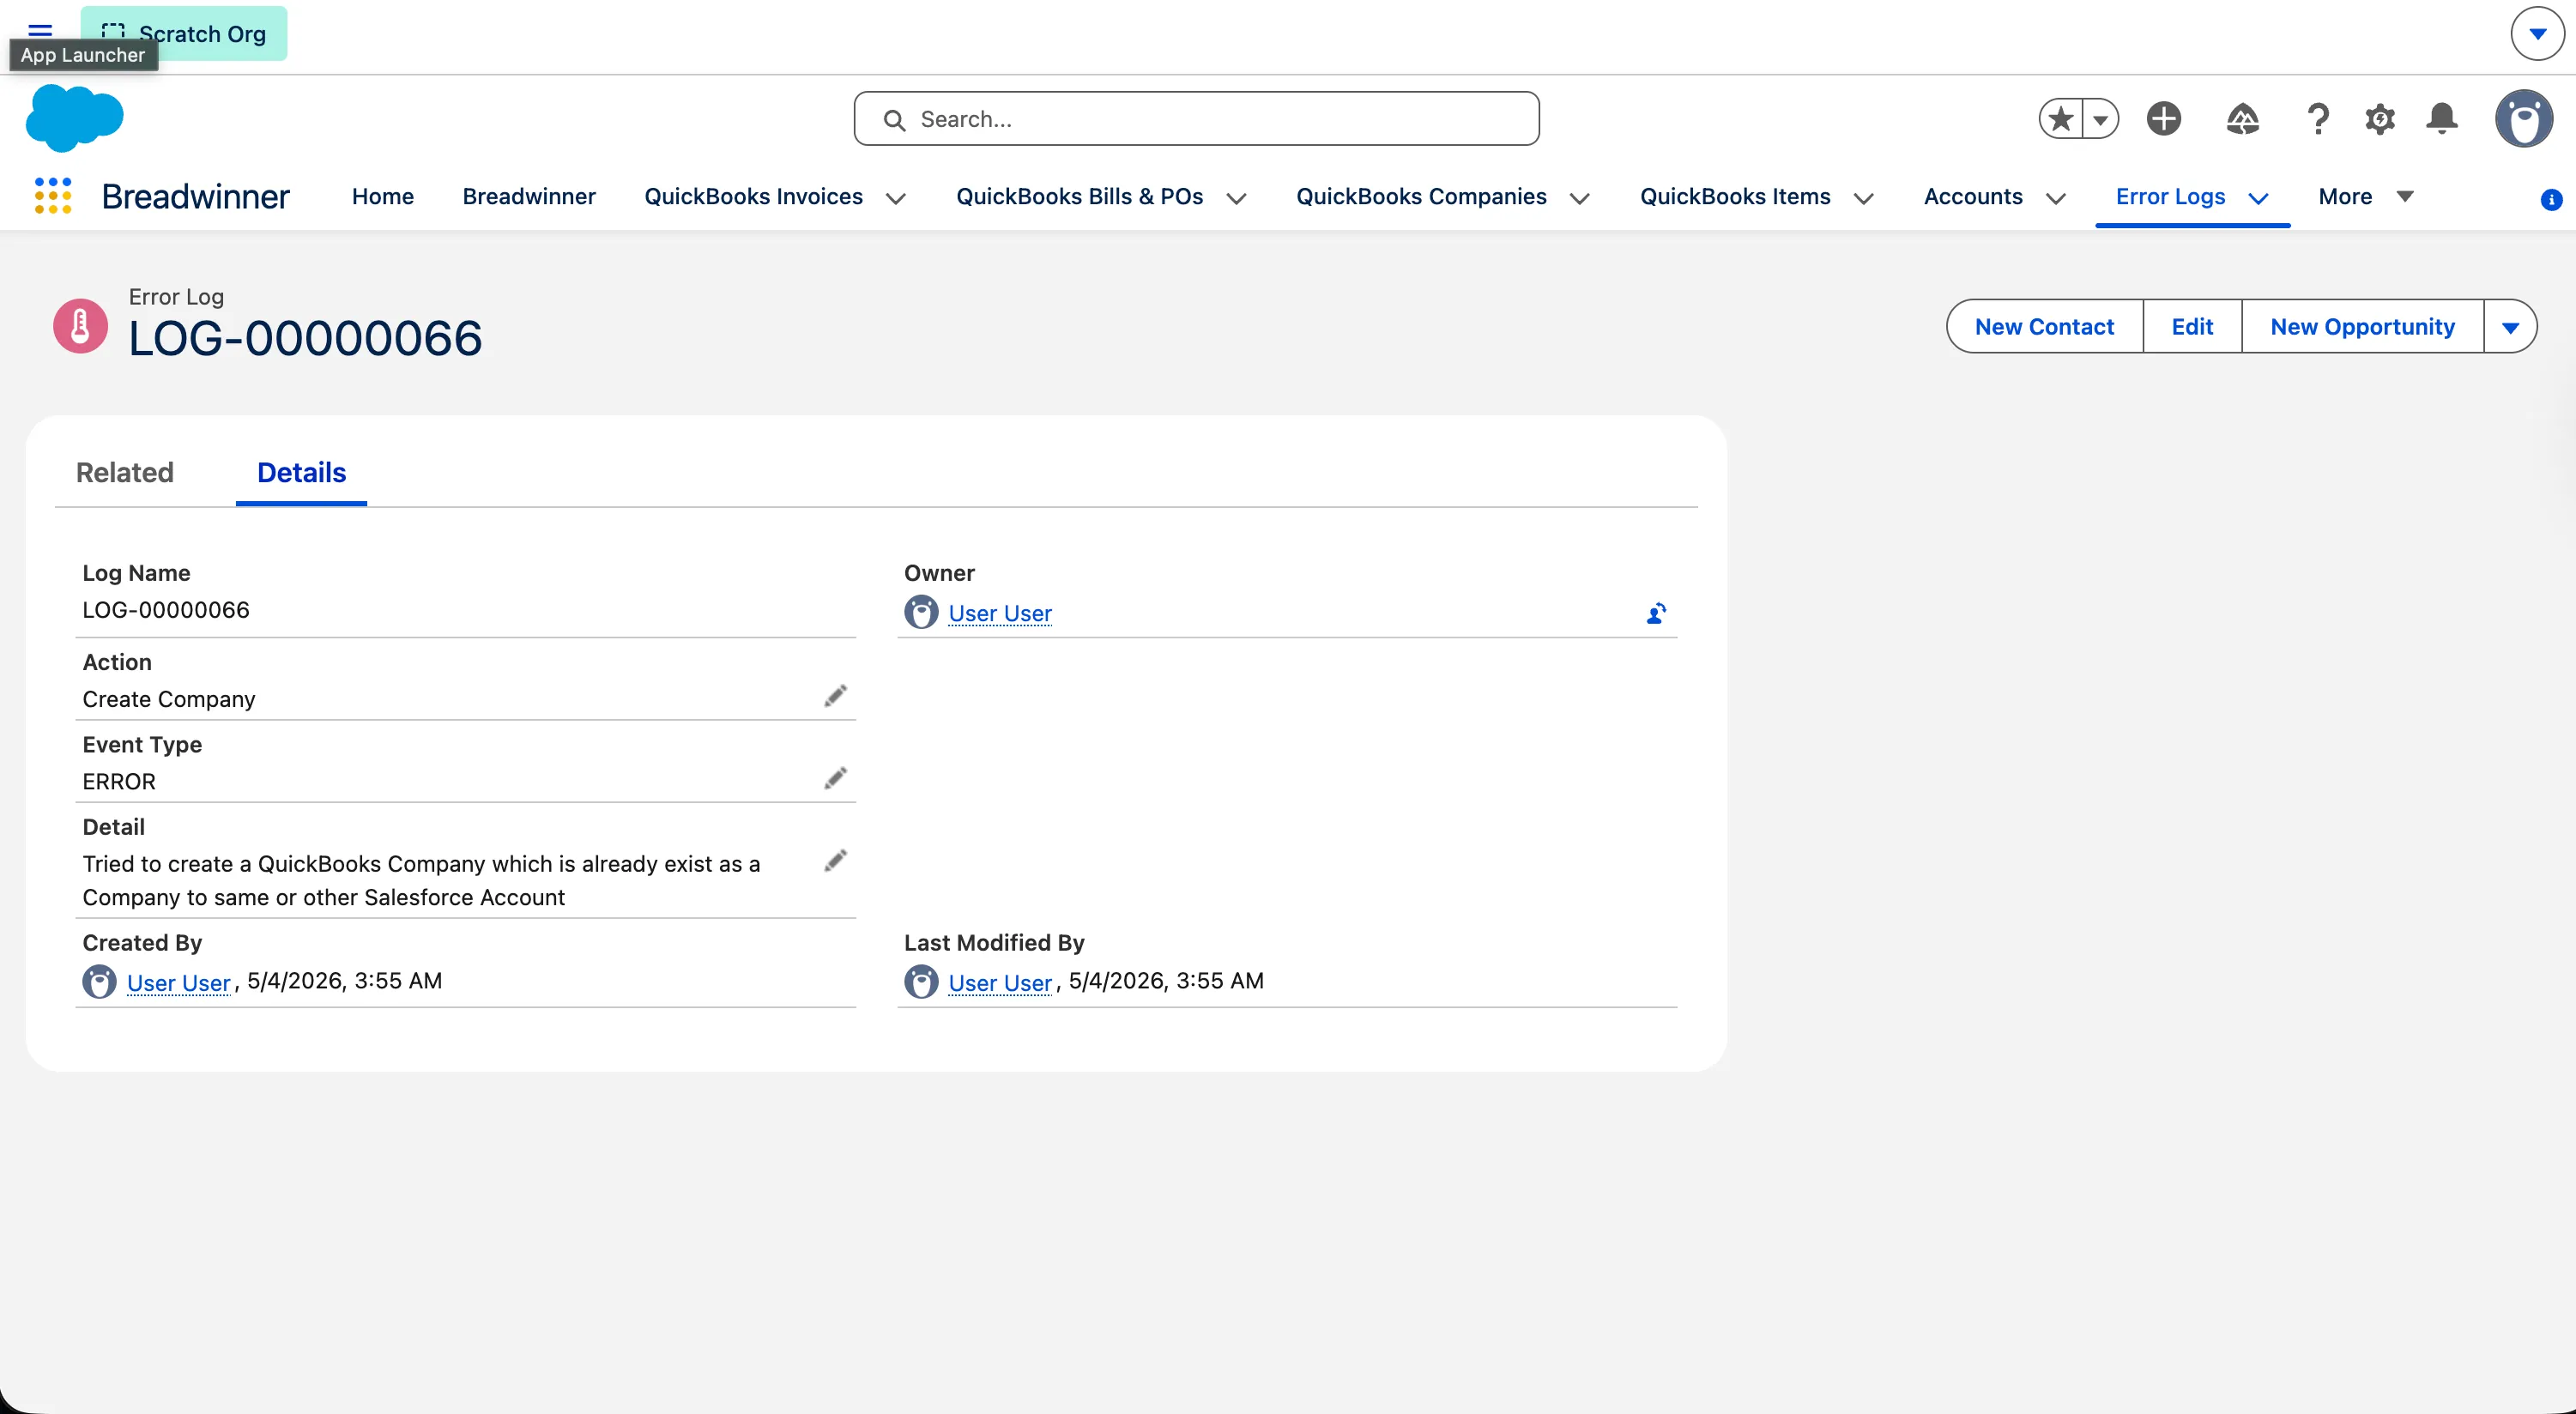
✔ A platform event should be published ✔ The flow should trigger automatically ✔ A new record should be created in Error_Log__c Object
What the Log Record Should Contain
- Action: Operation that failed
- Event Type: ERROR
- Detail: Detailed error message
Step 8: Deleting the Test Field
- Open Setup (⚙️ gear icon)
- Open Object Manager
- Open QuickBooks Company
- Delete the ‘Test’ field that we created earlier on the QuickBooks Company Object.